NCCL+PyTorch源码阅读(一):通信组的建立
前言:本文是对 知乎@张宇杭 系列文章的补充,只对核心逻辑进行拆解。阅读后可继续通过 知乎@张宇杭 的 NCCL 源码阅读补充更多知识。
另推荐 Demystifying NCCL,对 NCCL 的机制和设计层面进行了详细讲解。
在使用 PyTorch 作为深度学习框架时,如果涉及模型的切分,需要创建一个“通信组”(process_group)。后续的所有模型操作需要在通信组内进行同步操作。先用 CPU/Gloo 版 DDP 说明 process_group 的作用:
1 | import torch |
其中 dist.init_process_group 建立了一个进程组,告诉 PyTorch 参与的机器数量和自身编号。以DP为例,DistributedSampler 只负责按 rank/world_size 切分数据,不参与梯度同步。梯度同步由 DistributedDataParallel 完成:DDP 在构造时为模型参数注册 autograd hook,在反向传播过程中,当参数梯度就绪时触发 all-reduce,从而在进程组内同步梯度。运行完成后调用 dist.destroy_process_group() 销毁进程组。
本文会简要分析 NCCL backend 下通信组建立的过程。
应用层
在应用层,用户调用了 dist.init_process_group,传入自身机器编号(rank)和总机器数(world size)。这是一个阻塞的函数,PyTorch 会等待所有机器全部加入进程组后返回。这个函数会创建进程组,用于给服务同一个模型的所有进程一个轻量的通信接口;在进程组建立之后,实际的 NCCL 通信会落到对应的 NCCL communicator 上。
一般通过 torchrun 启动程序:torchrun --nproc_per_node=2 dp.py。torchrun 会自动分配好 MASTER_ADDR、MASTER_PORT、RANK、WORLD_SIZE并写入环境变量。当一个进程同时属于多个通信组时,MASTER_ADDR/MASTER_PORT 只负责 rendezvous,也就是让进程们先找到彼此;它们不等价于通信组本身。init_process_group 建立的是默认进程组,后续如果需要更多通信组,应通过 dist.new_group(ranks=...) 创建子组,并在 collective 调用中显式传入 group 参数,例如:
1 | default_pg = dist.group.WORLD |
同一台机器可以同时参与多个通信组:每个 PyTorch 组在内部对应一个 ProcessGroup 对象,collective 操作根据传入的 group 选择通信域;如果不传,则默认使用整个进程组作为通信组。
PyTorch 层
dist.init_process_group 位于 torch/distributed/distributed_c10d.py:1664:
1 | def init_process_group( |
init_process_group主要负责:
- 检查没初始化过
- 确定 backend / timeout / device
- 通过 env:// 或 tcp:// 等 rendezvous 找到其他进程
- 建立共享 Store
- 创建 ProcessGroup
- 创建 Gloo/NCCL 等具体通信后端
- 注册到默认 WORLD group
- 让后续 dist API 默认使用它通信
在运行之后,所有进程都注册到了同一个进程组;进程组中的每一个进程都获得了一个唯一的 rank。
但 NCCL 层的通信组建立是懒加载的,所以此时还没有建立具体的通信组。PyTorch 里 csrc/distributed/c10d/ProcessGroupNCCL.cpp:3757的 collective 函数是进行所有集合通信函数的 wrapper。在 3786 行有:
1 | const auto key = getKeyFromDevice(device); |
即每次尝试进行集合通讯时,都会判断当前通信组是否建立。如果没有建立则调用 initNCCLComm建立通信组获得一个 NCCLComm对象。在进行一些检查之后,通过 ncclComm_t comm = ncclComm->getNcclComm(); 获得一个真正存储了通信组元信息的 ncclComm_t 结构体。在调用 post(ncclStream, work); 之后,把这个结构体保存到 work 中并完成其余初始化,最后将带有通信组元信息的 work 对象加入工作队列。
initNCCLComm 是 PyTorch 里真正建立通信组的函数,位于 PyTorch 的 csrc/distributed/c10d/ProcessGroupNCCL.cpp:3052,签名是:
1 | std::shared_ptr<NCCLComm> ProcessGroupNCCL::initNCCLComm( |
参数含义:
deviceKey: 当前 CUDA device 的字符串 key,比如某个 GPU 对应的 key,用来缓存 communicator。device: 当前 tensor 所在 CUDA device。opType: 触发初始化的操作类型,比如 ALLREDUCE、SEND、RECV 等。p2pRank: 单个 P2P 操作时,本 rank 在两端通信里的局部 rank,通常是 0 或 1。isSendRecvSelf: 是否是同一个进程自己给自己 send/recv。
运行结束之后会返回一个NCCLComm对象,这个对象是对 NCCL 层ncclComm_t对象的简单封装,可以用于获取ncclComm_t对象或在获取失败时提供错误信息。
下面详细对 initNCCLComm 进行拆解。(注意,此时仍在 PyTorch 层,所有信息均由 PyTorch 维护)
首先进行一些检查
1
2
3
4
5
6
7
8if (deviceKey.empty()) {
... // deviceKey 不能为空,它来自当前 CUDA device,用于缓存 communicator
}
if (bound_device_id_) {
if (*bound_device_id_ != device) {
... // 如果当前被强制规定在某个 device 上初始化,当前 tensor 也要在同一个 device 上
}
}记录当前的通信组使用过了哪些 device
1
usedDeviceIdxs_.insert(device.index());
判断当前是否是一个P2P通信,分两种情况:
1
2bool batchP2P = ncclActiveGroupCounter_ > 0;
bool singleP2POp = isP2POp(opType, batchP2P);区分的原因是 NCCL communicator 的 rank/size 对 collective 和单个 P2P 不一样:
- collective / batch P2P:整个 process group 都参与
- single P2P:只有两个 rank 参与
- send-to-self:只有一个 rank
后面会根据这个设置:可以看出:NCCL communicator 里的 rank 不一定总是全局 rank,也不一定总是 ProcessGroup rank。单个 P2P 时,它是两端通信里的 0/1。1
2
3
4
5
6
7
8
9
10if (!singleP2POp) {
numRanks = getSize();
rank = getRank();
} else if (isSendRecvSelf) {
numRanks = 1;
rank = 0;
} else {
numRanks = 2;
rank = p2pRank;
}
处理已有的 NCCL Group。这里的原因在源码中给出了解释:
1
2
3
4
5
6
7
8
9
10
11
12
13
14
15
16
17
18
19// [Group Start/End Note] This is used to ensure that nccl communicator will
// be created before communication primitives are called. Let's look at this
// example: Using the batch_isend_irecv to send a tensor to a target process.
// On the sender side, the corresponding underlying NCCL calls will look like
// ncclGroupStart() // This is in batch_isend_irecv
// ncclCommInitRank() // Inside NCCLComm::create
// ncclSend()
// ncclGroupEnd() // This is in batch_isend_irecv
// With this pattern, the nccl communicator will be created in the last
// ncclGroupEnd which means when ncclSend is processed, the passed
// communicator argument is NULL which will lead to runtime error. So we need
// to "close" all active nccl groups to ensure nccl communicator is actually
// created before encountering any communication calls. This is why we need
// the following for loop.
for (const auto i : c10::irange(ncclActiveGroupCounter_)) {
(void)i;
// comms have not been initiated yet, so can only check in blocking-way
C10D_NCCL_CHECK(ncclGroupEnd(), std::nullopt);
}简而言之,如果当前已经处在
ncclGroupStart()/ncclGroupEnd()包裹的 batch P2P 中,ncclCommInitRank()如果也被放进 group 里,可能导致 communicator 还没真正创建,后面ncclSend/ncclRecv就拿到空 communicator。所以这里先临时结束 active NCCL group,确保 communicator 先初始化完。初始化完成后,后面会再ncclGroupStart()恢复回来。尝试通过
ncclCommSplit创建通信组
如果这个 PG 是从已有 PG split 出来的,并且不是单个 P2P,它会优先尝试:1
2ncclComm = NCCLComm::split(
parentComm.get(), options_->split_color, rank, options_->config);在
split中会从一个已经创建好的通信组里fork出一份新的子通信组。通过这种方式创建子通信组更快,因为后面不需要再获取 UniqueId 并进行所有 rank 的同步了,但需要父 communicator 存在且还没有被 abort。尝试通过
ncclCommInitRankScalable进行大规模初始化
和后面的逻辑是一样的。区别在于会生成多个 UniqueId 多点并行地进行初始化。获取 UniqueId 并分发
1
2
3
4
5
6
7
8
9
10if (getCvarBool(TORCH_NCCL_BCAST_UNIQUEID, true) && !isSendRecvSelf) {
// For point-to-point communication, lower rank of the two will get
// unique id.
if (rank_ == 0 || (singleP2POp && p2pRank == 0)) {
C10D_NCCL_CHECK(ncclGetUniqueId(&ncclID), std::nullopt);
}
// Broadcast so that each process can have a unique NCCL ID
broadcastUniqueNCCLID(&ncclID, singleP2POp, deviceKey, p2pRank);
}rank 0 会生成一个属于该通信组的临时 UniqueId,并将它广播给所有属于该通信组的 rank。这里 rank 0 会在
ncclGetUniqueId调用链中的bootstrapCreateRoot里新开一个线程执行bootstrapRoot。这个新开的线程会阻塞住,等待其他 rank 主动发起连接;但 rank 0 的主线程会继续执行下面 UniqueId 的分发广播。 有关 bootstrap 的流程会在 NCCL 层解读。
对于广播而言,在 broadcastUniqueNCCLID 中:
1 | if (!isSingleP2POp) { |
ncclCommCounter_ 用于记录当前这个进程里,这是第几次初始化。也就是说,PyTorch 依赖初始化的顺序严格一致来保证通信组建立的一致性,这也是为什么我们需要单独给 P2P 通信做特判:P2P 在通信组里发生的顺序是不一致的。
创建 NCCL Communicator
1
2
3
4
5
ncclComm = NCCLComm::create(numRanks, rank, ncclID, deviceIndex, options_->config);
ncclComm = NCCLComm::create(numRanks, rank, ncclID, deviceIndex);这里调用了
NCCLComm::create,在其中会调用ncclCommInitRank或ncclCommInitRankConfig。在其中所有 rank 都会参与 bootstrap,并向 root 提供自身的信息,将在 NCCL 层中介绍。创建 CUDA stream
创建 communicator 后,PyTorch 为这个 device 取一个 CUDA stream:1
2auto streamVal = at::cuda::getStreamFromPool(
options_->is_high_priority_stream || force_high);之后实际发生的 NCCL collective 会在这个 stream 上排队;stream 相当于一个任务队列,CUDA 会依次从中获取通信任务并执行。
临时放入 inInitializationCommMap_
1
inInitializationCommMap_.emplace(deviceKey, ncclComm);
与4对应,恢复 Active Group 的状态
1
2
3
4for (const auto i : c10::irange(ncclActiveGroupCounter_)) {
(void)i;
C10D_NCCL_CHECK(ncclGroupStart(), std::nullopt);
}保存 stream 和 event
1
2ncclStreams_.emplace(deviceKey, streamVal);
ncclEvents_.emplace(deviceKey, at::cuda::CUDAEvent(cudaEventDisableTiming));这些后续用于 stream 同步、work 完成检查等。
移入正式 communicator cache
最后把 communicator 从初始化 map 移到正式 map:1
2devNCCLCommMap_.emplace(deviceKey, std::move(it->second));
inInitializationCommMap_.erase(deviceKey);后续同一个 PG、同一个 device 再做 collective,就会通过
getNCCLComm(deviceKey)直接复用 communicator,不会重复初始化。
走到这里,在 PyTorch 层面就已经建立了可用的 NCCL 通信组,后续可以直接指定这一批 rank 组成的通信组进行符合拓扑条件的任何集合通信了。
NCCL 层
控制面通信组
在 PyTorch 层的第 7 步和第 8 步,我们分别调用了 NCCL 层的 ncclGetUniqueId 和 ncclCommInitRank/ncclCommInitRankConfig。NCCL 层正是在这两个函数中通过 bootstrap 机制完成了 NCCL 通信组的建立,包括通信组的识别和拓扑构建。本节将拆解这一流程。
本文中我们先关注 ncclGetUniqueId(这个函数只有 rank 0 会调用)。 它实现在 NCCL 的 src/init.cc:180:
1 | NCCL_API(ncclResult_t, ncclGetUniqueId, ncclUniqueId* out); |
它的作用是:生成一个 ncclUniqueId,给后续 ncclCommInitRank 用。 典型流程是 rank 0 调一次 ncclGetUniqueId(&id),然后通过 MPI、文件、socket、环境变量等方式(在这里是 PyTorch 使用 store)把这个 id 广播给所有 rank,所有 rank 再用同一个 id 调 ncclCommInitRank(...),这样 NCCL 才知道这些进程属于同一个 communicator。
ncclUniqueId 的类型是:typedef struct { char internal[NCCL_UNIQUE_ID_BYTES]; } ncclUniqueId;,里面实际上塞的是 ncclBootstrapHandle:
1 | struct ncclBootstrapHandle { |
也就是说,UniqueId 不是单纯随机数,而是 bootstrap 阶段需要的连接信息:一个 magic 标识、root 的 socket 地址,以及已有 rank 数量。后续 rank 连接 rank 0 时会用到这些信息(用 socket 找到 rank 0,用 magic 确保在同一个会话,rank 0 用 rank 数量确认所有人都到齐)。
在 ncclGetUniqueId 中的核心步骤是 bootstrapGetUniqueId,在这里面会生成 UniqueId 并启动 bootstrap root,位于 src/bootstrap.cc:426:
1 | ncclResult_t bootstrapGetUniqueId(struct ncclBootstrapHandle* handle, struct ncclComm* comm) { |
定位到其中的 bootstrapCreateRoot,位于 src/bootstrap.cc:401:
1 | ncclResult_t bootstrapCreateRoot(struct ncclBootstrapHandle* handle, bool idFromEnv) { |
在这里为 rank 0 创建了一个 LISTEN socket,这个 socket 就是 UniqueId 里携带的 socket,其他 rank 可以根据这个 socket 发送数据给 rank 0;此外完成了必要的信息填充。而后对当前 rank 0 启动了一个新的线程 bootstrapRoot,rank 0 的主线程可以直接返回。
从这里开始,我们就真正涉及到了通信环建立的具体过程。NCCL 的 bootstrap 过程是主要是在所有的 rank 之间建立一个环,并且交换各自的通信元数据。这个函数就是 rank 0 在建立通信环中需要做的事。 需要注意的是:这个通信环不是最终用于实际数据传输的,而是在拓扑建立阶段使用的一个临时通信环;他会赋予我们类似于控制面的通信能力,后续的 bootstrapAllGather 就要基于这个信道。对于一个通信环,我们期望达到下图的效果: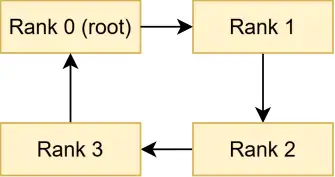
NCCL 采用的方案是:让每一个 rank 都把自己的 LISTEN socket 连接信息发给 root,再由 root 分发下一跳的连接信息。 NCCL 在 bootstrapRoot 里完成了 rank 0 对这些连接信息的监听和分发。
回想之前我们在 PyTorch 层面生成和广播的 UniqueId:其中包含了 rank 0 的 LISTEN socket,所以每个 rank 都可以向 root(rank 0) 发送信息。但 root 并不知道其他 rank 的 LISTEN socket,所以也没有办法把每个 rank 对应的下一跳连接信息分发下去。为了解决这个问题,NCCL 会让其余 rank 额外创建一个 LISTEN socket 专门用于和 root 的通信,并在向 root 发送自己在通信环中的 LISTEN socket 时,顺便也把专用于和 root 通信的 LISTEN socket 也附带上。
具体到代码实现,在 bootstrapInit 里:
- 每个 rank 都会先创建一个监听端口
info.connectInfo,代表“别人要连我进行 bootstrap ring 通信时需要的信息” - 每个 rank 还会创建一个给 root 回连自己的监听 socket
info.listenRootAddress,代表“root 要把结果发回给我时用的地址”
每个 rank 把这两个信息打包成 extInfo 发给 root:
1 | struct extInfo { |
root 收到这些信息后,把对应每个人发送目标的 LISTEN socket 连接信息分发下去。
bootstrapRoot 函数位于 src/bootstrap.cc:287:
1 | do { |
root 会循环使用自己的 LISTEN socket 建立连接接受其他 rank 的数据,处理完成后退出循环。每一次循环内的具体流程如下:
- 第一次收到信息时的初始化几个变量含义:
1
2
3
4
5
6
7
8
9
10
11
12
13
14if (c == 0) {
BOOTSTRAP_PROF_CLOSE(timers[BOOTSTRAP_INIT_ROOT_WAIT]);
BOOTSTRAP_PROF_OPEN(timers[BOOTSTRAP_INIT_ROOT_RECV]);
nranks = info.nranks;
iroot = info.iroot;
nroots = info.nroots;
offset = info.offset;
// if the number of root > 1, we will receive one extra info from the first local_id of the next root
n2send = nRankFromRoot(iroot, nranks, nroots, offset);
// offset>0 automatically means that we need to switch to the multiroot logic
nrecv = n2send + ((offset > 0 || nroots > 1) ? 1 : 0);
NCCLCHECKGOTO(ncclCalloc(&rankInfo, nrecv), res, out);
NCCLCHECKGOTO(ncclCalloc(&rankAddressesRoot, nrecv), res, out);
}
nranks:总 rank 数。nroots:有多少个 bootstrap root。普通ncclGetUniqueId通常是 1;ncclCommInitRankScalable可能多个。iroot:当前这个 root 是第几个 root。n2send:这个 root 正常负责的 rank 数量。nrecv:这个 root 实际要接收的信息数量。多 root 或 grow 场景下,可能要额外接收一个边界 rank 的信息,用来跨 root 拼 ring。
- 看能不能把下一个/当前 rank 的信息发给当前/上一个 rankroot 不是先收集完成所有人再统一下发,而是边收边发。因为早点发可以更早结束目标 rank 的初始化阻塞部分,让他快点进入后面的通信组建立/具体计算过程。
1
2
3
4
5
6
7
8
9
10
11
12
13
14
15
16
17
18// if the previous has already checked in, send the newly received handle, if not save the handle for later
// if we have more than 1 root, I do not own the previous of local_id = 0
// if we have prev > n2send, we do not send anything
int prev = (nroots > 1) ? (localId - 1) : BOOTSTRAP_PID(localId - 1, nrecv);
if (prev >= 0 && prev < n2send && memcmp(&zeroAddress, &rankAddressesRoot[prev], sizeof(union ncclSocketAddress)) != 0) {
NCCLCHECKGOTO(rootSend(&rankAddressesRoot[prev], magic, &info.connectInfo), res, out);
} else {
memcpy(&rankInfo[localId], &info.connectInfo, sizeof(union ringConnectInfo));
}
// if the next rank has checked in, send the newly received info, if not save the addr for later
// for nroots >=1, I will always own the information of the next connection
// if the local_id id must be [0 ; n2send[ otherwise we do not answer
int next = BOOTSTRAP_PID(localId + 1, nrecv);
if (localId >= 0 && localId < n2send && memcmp(&zeroInfo, &rankInfo[next], sizeof(union ringConnectInfo)) != 0) {
NCCLCHECKGOTO(rootSend(&info.listenRootAddress, magic, &rankInfo[next]), res, out);
} else {
memcpy(rankAddressesRoot + localId, &info.listenRootAddress, sizeof(union ncclSocketAddress));
}
循环结束之后有可能还有漏的,此时统一进行补发:
1 | for (int r = 0; r < n2send; ++r) { |
举个例子。在上面 world_size = 4 的例子中,rank 0 会开一个线程进入 bootstrapRoot 并开始阻塞监听,把监听 socket 通过 UniqueId 在 Torch 层分发给了 rank 1/2/3。随后 4 个 rank 都会在 ncclCommInitRank 中向 rank 0 进行:
- 发送自己的
bootstrap LISTEN socket - 发送自己专门为 rank 0 通信准备的
listenRootAddress
rank 0 在收到 0/1/2/3 的bootstrap LISTEN socket后,把 rank 1 的bootstrap LISTEN socket发给 rank 0(自己)、把 rank 2 的bootstrap LISTEN socket通过 rank 1 的listenRootAddress发给 rank 1 ……以此类推。
接下来看所有 rank 在 ncclCommInitRank 里是如何配合 rank 0 的。ncclCommInitRank 函数在 src/init.cc:2404:
1 | NCCL_API(ncclResult_t, ncclCommInitRank, ncclComm_t* newcomm, int nranks, ncclUniqueId commId, int myrank); |
首先调用了 ncclInitEnv 和 ncclCudaLibraryInit 初始化 CUDA 环境和驱动;随后用 cudaGetDevice 获取当前进程所使用的设备(GPU)。真正的初始化流程在 ncclCommInitRankDev 中(src/init.cc:2323):
1 | static ncclResult_t ncclCommInitRankDev(ncclComm_t* newcomm, int nranks, int nId, ncclUniqueId* commId, int myrank, int cudaDev, ncclConfig_t *config, const char funcName[]) |
nId 代表 UniqueId 的数量,函数开头会进行检查(nId > 0 && nId <= nranks),一般来说是 1,在 ScalableInit 时会出现多个根结点。
在 ncclCommInitRankDev 里主要做了这几件事:
src/init.cc:2333:ncclInit(),这里触发全局 one-time 初始化src/init.cc:2351:分配 comm、abortFlag、abortFlagDevsrc/init.cc:2357:parseCommConfigsrc/init.cc:2369:复制 commId 到 job 自己的内存,注释里明确说是为了 async init 和 alignmentsrc/init.cc:2387:ncclAsyncLaunch(... ncclCommInitRankFunc ...),启动了一个异步的 job 调用ncclCommInitRankFunc
与bootstrapGetUniqueId类似,用户线程看到的是同步 API,但 NCCL 内部把初始化主体封装成 async job,再由 group 机制收口。
到这里我们整理一下:rank 0 一开始启动了一个 bootstrapGetUniqueId 线程等着所有 rank 给他发信息,而后所有 rank 又都创建了一个包含 ncclCommInitRankFunc 的 job 参与通信组的建立和拓扑探测。所有 rank 的主线程会在 ncclGroupEndInternal() 中执行完所有的 job,随后返回。
现在继续进入 ncclCommInitRankFunc(src/init.cc:1762)。在这个函数里主要做四件事:
- 用
unique id算commHash:comm->commHash = getHash(job->commId->internal, NCCL_UNIQUE_ID_BYTES); commAlloc填communicator基础资源:commAlloc(comm, NULL, job->nranks, job->myrank);bootstrapInit建 bootstrap 控制环:bootstrapInit(job->nId, (struct ncclBootstrapHandle*)job->commId, comm, job->parent);initTransportsRank建真正通信拓扑和 transport 信息:initTransportsRank(comm, job->parent, timers);
本节我们先关注 bootstrap 控制环的建立。bootstrapInit 位于 src/bootstrap.cc:674,主要流程包含:
- 进行必要的初始化,包括 magic 生成和 rank 写入等
- 创建 bootstrap LISTEN socket:如果提供了 BootstrapNet 就用提供的,否则创建一个 socket
1
2
3
4
5
6
7
8
9if (ncclParamBootstrapNetEnable()) {
// Create net interface for other ranks to contact me (all gather)
NCCLCHECK(netGetDevice(rank, comm, &STATE_LISTEN(state, net.dev)));
NCCLCHECK(state->net->listen(comm->netContext, STATE_LISTEN(state, net.dev), STATE_LISTEN(state, net.handle), &STATE_LISTEN(state, net.comm)));
memcpy(info.connectInfo.handle, STATE_LISTEN(state, net.handle), NCCL_NET_HANDLE_MAXSIZE);
} else {
// create socket for ring neightbor to contact mee
NCCLCHECK(createListenSocket(comm, comm->magic, &STATE_LISTEN(state, socket), &info.connectInfo.addr, ncclSocketTypeBootstrap));
} - 创建 listenRootAddress:
1
2int curr_root = rootIdFromRank(rank, nranks, nHandles, offset);
if(curr_root >= 0) NCCLCHECK(createListenSocket(comm, BOOTSTRAP_HANDLE(handles, curr_root)->magic, &listenSockRoot, &info.listenRootAddress, ncclSocketTypeBootstrap)); - 把 socket 推送给 root:
sendToRoot(BOOTSTRAP_HANDLE(handles, curr_root), comm, &info) - 从 root 获得 bootstrap 环中下一个人的 LISTEN socket:
1
2
3
4
5NCCLCHECK(ncclSocketInit(&sock));
NCCLCHECK(ncclSocketAccept(&sock, &listenSockRoot));
NCCLCHECK(socketRecv(&sock, &nextPeer, sizeof(nextPeer)));
NCCLCHECK(ncclSocketClose(&sock));
NCCLCHECK(ncclSocketClose(&listenSockRoot)); - 环状建连,调用
socketRingConnect:1
2
3
4
5
6
7static ncclResult_t socketRingConnect(ncclSocketAddress* addr, struct ncclSocket* sendSocket, struct ncclSocket* listenSock, struct ncclSocket* recvSocket, uint64_t magic, volatile uint32_t* abortFlag) {
NCCLCHECK(ncclSocketInit(sendSocket, addr, magic, ncclSocketTypeBootstrap, abortFlag));
NCCLCHECK(ncclSocketConnect(sendSocket));
NCCLCHECK(ncclSocketInit(recvSocket));
NCCLCHECK(ncclSocketAccept(recvSocket, listenSock));
return ncclSuccess;
} - 最后使用刚刚建立好的 bootstrap 通信环交换各自的元信息(
bootstrapAllGather)
至此控制面通信环建立完成。
数据面通信组
通信组的建立主要包含以下流程:
- 本地设备拓扑探测
- 本地 Channel 搜索
- 跨机器 Channel 搜索
- 跨机器 Channel Graph 合并
本文不对这一部分进行详细展开,仅在 知乎@张宇杭 系列文章基础上进行总结。
首先明确这一阶段的目标:我们已经拿到了所有通信组的信息(rank、目标逻辑拓扑),现在需要探测实际的硬件资源(GPU、CPU、PCIe树、NIC)并尝试把硬件资源合理地分配给每一条逻辑链路。
NCCL 预设了 6 种设备:
- GPU:GPU设备
- PCI:PCI Switch
- NVS:NV Switch
- CPU:NUMA(PCIe Root Complex)
- NIC:网卡
- NET:网口
NCCL 将所有设备之间按是否直连建图,每条边包含四个元信息:
- bw:链路带宽
- latency:链路延迟
- type:NVL/PIX/PHB/SYS
- hops:跳数
NCCL 中常见的设备间通信手段包括了 PCIe(包含 CPU(Root Complex)、DMA)、GDR、PXN(使用 NVLink/PCIe 进行跨 NUMA 旁路路由,而非经过 Root Complex)、IB、RDMA、TCP等。
NCCL 对所有待分配路径的 ring/tree 进行基于 SM 能力的带宽消耗预测,尝试从高带宽消耗开始进行资源分配;若分配失败则会逐步降低带宽预算。
本地设备拓扑探测:将上述信息全部探测完毕进行建图
本地 Channel 搜索:求解 Channel 的合理数量和各 Channel 的带宽分配;使用 BFS 在图上进行搜索
跨机器 Channel 搜索:这里不是真的要跨机器搜索,而是把 Ring/Tree 进行切分并连接在网络设备上,把本机负责的部分分配好
跨机器 Channel Graph 合并:将不同机器上的局部 Ring/Tree Channel 进行合并